Vegan Tiger Nut & Peanut Chilli-Burger

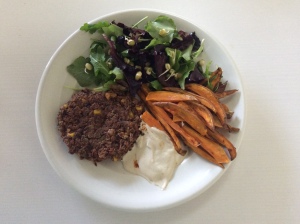
Creating a tasty vegan burger that is also gluten-free and nightshade free is quite a task. This has to be our best effort so far! It all came together at the first attempt and didn’t break up when cooking or turning. It was spicy, with some texture from the peanuts, mushrooms and celery. We will definitely make these again.

The challenge was to make something a bit different, preferably savoury, with the pulp left-over from making the horchata or Tiger Nut Milk with the new Naked Organic Peeled Tiger Nuts from The Tiger Nut Company.

(Don’t be put off if you don’t have access to tiger nuts, you could use other nut pulp or robust glutenfree flour).

Here’s the result:

(All ingredients are organic except the bouillon powder, everything is also vegan, gluten and nightshade-free, except the teaspoon of chilli flakes. I don’t generally eat peppers of any kind, but decided to have a pepper holiday for the purposes of this exercise. You can use any spice you prefer).

Ingredients

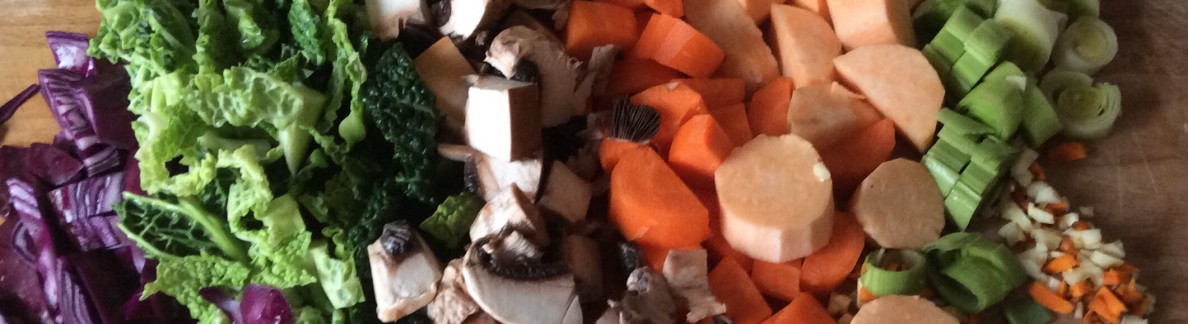
1 Cup Cooked Red Kidney Beans, or Tinned and rinsed

3/4 Cup Naked Tiger Nut Pulp (or any nut pulp or glutenfree flour)

1/2 Cup Coarsely Ground Organic Red Peanuts

1 Medium Purple Onion, chopped

1 Large Clove Garlic, pressed

1 Tbsp Chia Seeds*

3 Small Chestnut Mushrooms, chopped

2″ (5 cms) Courgette (Zucchini), washed and chopped (skin left on)

4″ (10 cms) Celery Stick, chopped + some chopped celery leaves

1/2 Small Carrot (skin left on) grated

1 Tsp Vegan Bouillon Powder

1/2 – 1 Tsp Chilli Flakes, depending on how spicy you want them

Splash of Tamari

Pinch of Pink Himalayan Salt and plenty of Ground Black Pepper to taste

Tiger Nut Flour for dusting – we used Chufa de Valencia because that’s what we had. It added a little texture when cooked – but chickpea flour is good too.

Coconut oil for frying

Method

imagePut everything except the Flour in a food processor and keep pulsing until it comes together enough to make a ball. You don’t want it smooth and mushy, but still with some bite.

Dust a board with some Tiger Nut Flour and some on your hands. Take small handfuls of the mix and shape into burgers. The  mixture should be enough to make 5 burgers, depending on size, we got a bit over-enthusiastic with the first and ended up with a tiny 5th one!

image

Heat some coconut oil in a frying pan until hot but not smoking.

Cook the burgers, turning over a couple of times with a fish slice to cook through.

image

We had intended to have savoury rice or quinoa and a green salad with them, but we were so caught up in the creative process and whether they would work or have to scrap it and make something else, we quite forgot and ended up steaming some leftover veggies. Regardless, they were very good. Even boingghealth would like them! (He loves his chilli!)

Ps There are more Tiger Nut Recipes here

image

*http://www.therawchocolatecompany.com/

Copyright: Chris McGowan

Dipped Naked Tiger Nut, Mango & Orange Treats

I recently reviewed the new Naked Organic Peeled Tiger Nuts from The Tiger Nut Company (see here) and wrote that I’d post a recipe using the resulting finer, smoother Tiger Nut Milk pulp. I know you’ve been waiting with bated breath, so here it is!

These fruit balls are packed with energy, protein, essential healthy fats, vitamins and minerals and are moist and tasty with a distinct chocolatey orange flavour.

All ingredients are organic, vegan and gluten-free. All measurements are approximate.

Ingredients

1 Cup Naked Tiger Nut Milk Pulp

1 Cup Dried Mango Pieces + 1/4 Cup Goji Berries*

Both soaked in the juice of 1 small orange

1/4 Cup Golden Linseeds/Flaxseeds, partially ground

1/2 Tbsp Chia Seeds,* very lightly moistened

2 Tbsps Melted Raw Cacao Butter*

2-3 Squares Mini Orange & Goji Raw Chocolate,* grated

****

Pulse and process all the above for a few seconds until it comes together.

Take pieces of the mix and roll them into balls.

image

Melt the rest of the mini bar of Raw Orange & Goji Chocolate in a bowl over hot but not boiling water, with 1 Tsp of solid Raw Cacao Butter

Dip the fruit balls in the melted chocolate and place in the fridge to set.

image

The pulp from the Naked Tiger Nuts makes a much finer, smoother texture than the original Organic Unpeeled Tiger Nuts when making energy balls.

Ps See also my Page of Tiger Nut Recipes

*http://www.therawchocolatecompany.com/

Copyright: Chris McGowan

Tiger Nut Chia Breakfast Bowl with Apricots & Raspberries

Ani of The Tiger Nut Company set me a challenge with her announcement on Instagram that I would be publishing new recipes on my Tiger Nut Page every day this week, which was a little daunting to say the least. In fact I had intended posting a couple of new recipes and reposting old ones! So I had to work fast, this and the following  posts are the results of my efforts…

In my first post, I did a review of their new Naked Organic Peeled Tiger Nuts and made Horchata with them (see here). The next morning, I decided to use some of the resulting tiger nut milk in my breakfast bowl and came up with this summer fruit combo that is not only rich in protein, fibre, essential fatty acids, B vitamins, Vitamins A and C, and minerals, but will satisfy your taste bids and your tummy too!

I promise there are no hidden veggies in this one!

 image

Tiger Nut Milk made from Naked Organic Peeled Tiger Nuts and stored in my funky Grip and Go glass bottle.

It’s a good idea while the summer fruits are in season to pop some in the freezer for later on when they are no longer available. I have used frozen apricot slices for this (I did let them defrost before I ate it!)

For a change, I used buckwheat flakes instead of oats. Despite their name, they are gluten-free and have a nice texture too. They are high in protein, dietary fibre, antioxidants and have cholesterol-lowering properties too. They aren’t from grain but a seed that is related to rhubarb.

This can be prepared the night before or put them to soak while you have your shower in the morning.

All ingredients were organic, vegan and gluten-free.

Ingredients

1 Cup Buckwheat Flakes

1 Tbsp Chia Seeds*

1 Tbsp Golden Linseeds

Soak all these in

1 1/2 Cups chilled Tiger Nut Milk (recipe here)

for at least an hour or overnight in the fridge

image

When they have absorbed the milk, add a litle more if needed.

Decorate with fresh Apricot slices and Raspberries

Top with plain CoYo Coconut Yogurt and a Blueberry (or two)

*

image

This is such a healthy and satisfying breakfast, it will keep you going all morning and if you prepare it the night before it will take no time to finish it off next morning.

*http://www.therawchocolatecompany.com/

Copyright: Chris McGowan

Review: Taste-Testing The New Naked Organic Tiger Nuts from The Tiger Nut Company

I love Tiger Nut Milk or Horchata. It is sweet and creamy and full of nutrients: Tiger Nuts (tubers really, not nuts) contain protein, fibre, potassium, magnesium, calcium, iron, multiple vitamins and oleic acid, they’re also a prebiotic which makes for a healthy gut environment in which probiotics can grow (see here for recipe).

We usually make Horchata with unpeeled Organic Tiger Nuts from The Tiger Nut Company* and use the resulting pulp residue to make raw cookies or energy balls, but the pulp can be a bit coarse from the skins. So I was delighted when Ani recently announced their new product: Naked (ie peeled) Organic Tiger Nuts!

I couldn’t wait to try them and to see if they would make as good quality milk as the original Organic Unpeeled and also it would be interesting to see if the pulp was any finer or more versatile.

I used the same recipe for both milks, omitting the vanilla extract I usually add, because I wanted to taste them raw.

Here is the result:

On the left is the original unpeeled milk, on the right the new Naked milk. (Stored in my glass Grip and Go bottles).

Firstly, I noticed that the Naked made roughly 100mls less milk than the unpeeled – about 600mls compared with about 700mls – hardly anything (although it looks in the photos as if it’s the other way round, there was some left over that I put into small jars).

Second, the pulp from the Naked was lighter and slightly finer.

image

On the left is the unpeeled, on the right the Naked and for comparison the Chufa de Valencia Tiger Nut Flour.

The milk from the Naked was infinitesimally thinner, but only a regular drinker could notice the difference, and only by tasting one after the other and really thinking about it! My husband couldn’t tell. It was still sweet and creamy.

The pulp from the Naked was much better for baking, easy to use with a much finer texture. We made some Dipped Tiger Nut, Mango & Orange Fruit Treats, which I’ll post later in the week, they were smooth and not at all gritty.

image

My son asked if there would be a loss of nutrients, which is a fair point, but the Naked still retain a little of their skin and if it it makes the difference between discarding the pulp because it is too coarse or using the finer Naked pulp, I’d say it balances out pretty well.

All in all, I am delighted with this new product and highly recommend it!  

Ps There are other Tiger Nut Recipes here

Home-2016

Copyright: Chris McGowan

Summer Lovin’ Fruit Smoothie!

image

I LOVE summer fruits! They are here and gone all too soon. Normally I eat them as they are, all soft and ripe and oozing with juice,  or at most, chopped into a summer fruit salad with coconut yogurt and cinnamon. Today, however, I had an under-ripe nectarine, an over-ripe plum and a small galia melon that was on its way to becoming alcoholic!

Into the blender they went.

(This is a smoothie you can drink, no cutlery needed this time!)

*

Ingredients

(All organic, vegan and gluten-free)

Soak a heaped Tbsp of Buckwheat Flakes in the blender

with

1 Small Glass Chi Coconut Water – unsweetened –

while you get the other items ready.

1/2 Small Ripe Galia Melon, deseeded and flesh chopped

(Squeeze the juice from the skin into the blender – waste not, want not!)

1 Nectarine, pitted and chopped

1 Plum, pitted and chopped

Small handful of Cashew Nut Pieces

(Cashew nuts contain magnesium which helps you relax and lifts your mood)

Heaped Tbsp CoYo Plain Coconut Yogurt

Blend and serve.

You could try adding a pinch of Cinnamon or Ground Ginger, if liked.

Here’s some summer lovin’ with John Travolta & Olivia Neutron Bomb! (If you’re reading this via email, you need to click onto the blog to see the video).

Copyright: Chris McGowan

Vegan Gluten-Free Almond & Apricot Scones – oh yes!

imageI haven’t had home-baked scones – or any scones for that matter – for soooo long! Many moons ago, before I became vegan, gluten-free, juicer and raw foodie, they were my favourite comfort food. They were so quick and easy to make.

I haven’t had anything resembling baked goods in years. I haven’t missed them at all. I love my raw treats. But you know how sometimes, you’re sitting or lying, minding your own business and suddenly, wham! it hits you: you just have to have that little something (as Winnie the Pooh called it). That very specific something. Nothing else will do. For me, in the early hours of this morning when I couldn’t sleep, it was scones! So I spent the next hours musing over how I could devise a recipe that ticked all my boxes.

So here it is, my first baking recipe! Don’t get too comfy, I’m not morphing into Delia! It’s a one-off.*

This was our first attempt, and I have to say, given all the guesswork involved, I am really pleased with them. I tried to make them as healthy as possible, so they have protein, B vitamins, Vitamin A, Iron and so on. Enjoy as an occasional treat.

Ingredients

1 Tbsp Chia Seeds soaked in 3 Tbsps Water for 10-15 mins. Stir vigorously every so often (known as a chia egg).

80z Organic Cornflour (it’s yellow, you know!)

1 oz freshly ground Almonds

1 Tsp Gluten-free Baking Powder

2 oz Solid Raw Virgin Coconut Oil 

1 oz Coconut Palm Sugar

4 Sulphur-free Organic Dried Apricots (pre-soaked if very dry)

Pinch of Pink Himalayan Salt

1/2 Cup Almond Milk – preferably home-made, click this link for how to make your own

Method

imageSift the flour, baking powder, ground almonds and coconut palm sugar into a large bowl.

Add the salt and coconut oil.

Using fingertips, blend into flour mix until it resembles breadcrumbs.

Add chia egg and using a round bladed knife mix it into the flour mix.

Stir in dried apricots and add almond milk.

Using fingers, gather it together and knead. It should be quite soft and moist and combine into a ball.

image
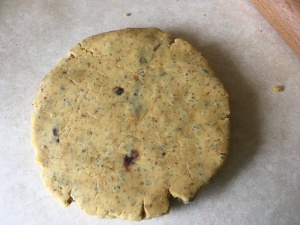
Gently roll it to out to just over an inch in depth. They won’t rise much so bear that in mind.

Using whatever shaped cutter you like, cut out about 7 or 8 scones. We used a medium size.

Place on baking parchment on a baking try – we didn’t have any and the scones got a little overdone on the underneath. Brush the tops with a little milk.

Place in the oven at 190C for a fan oven.

Cook for about 10 mins. but keep your eye on them. Ours were in a little too long, but they still tasted lovely.

image

Cool on a rack.

Split and add whatever takes your fancy, mine had strawberry fruit spread and peanut butter (didn’t have any almond). I would have much preferred my Nannie’s home-made Almond and Apricot jam, which would have been perfect. She used to make huge batches of it, as well as damson and apple, and distribute it amongst her family, it would last us all year!

*Ok, I lied! Vegan, Gluten-Free Plum Crumble – Nice, But Not Too Naughty!

The Organic Chia Seeds and Organic Coconut Palm Sugar are from The Raw Chocolate Company

The Organic Cornflour and Organic Almonds are from  Buy Wholefoods Online UK

The Raw Virgin Coconut Oil is from Lucy Bee Coconut

Copyright: Chris McGowan

Vegan Gluten-Free Tiger Nut Bread Mark ll

image
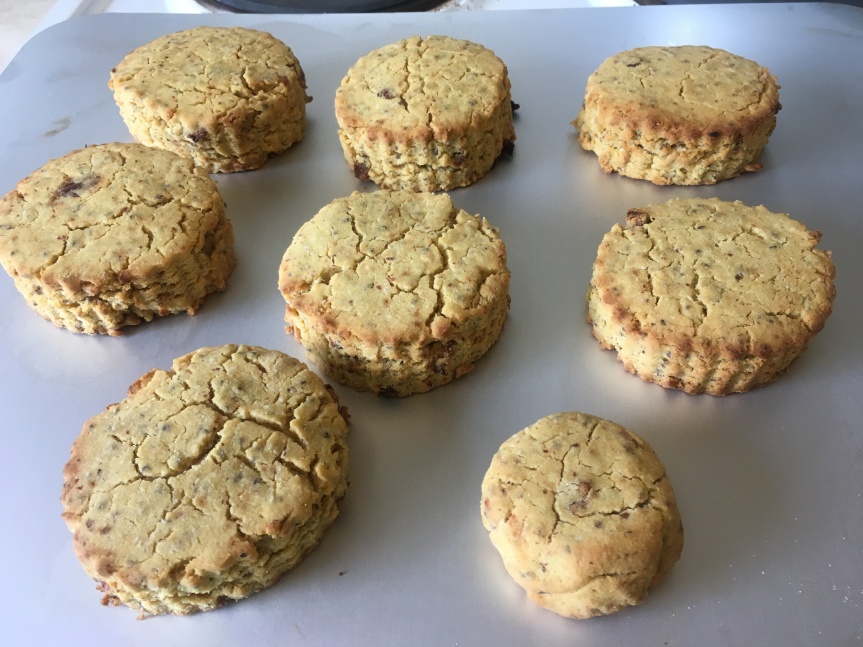
Anyone who is gluten-free for whatever reason will know how difficult it is to find a commercial gluten-free loaf that doesn’t look and taste like cardboard and is, if you’re lucky, only ‘good’ for toasting. It lasts a day and then breaks up. It has no flavour other than of additives, and no texture – and if you look at the list of ingredients, you may as well be reading a chemistry experiment!

We have several family members who are gluten-free and have made many variations of gluten-free loaves over the years. We find the ones made in the breadmaker are best, but it’s a bit hit and miss. One day it will come out perfect, the next the paddle will refuse to come out and you have a big hole in the middle or the bottom inch of the loaf isn’t cooked properly.

So, I am ever on the hunt for new recipes to try. This is our latest attempt based on a recipe I found by Dan Lepard on BBC Food. The first one we made, we used all tiger nut flour* as we didn’t have cornflour and it gave a lovely brown colour and lots of texture, but I think there was too much liquid: it spread too much and was very crusty.


So this is our second attempt and we kept a little closer to the original, although we didn’t have enough cornflour or enough tiger nut flour for the whole loaf, so we included some organic chickpea flour and a smaller amount of tiger nut flour this time. (You might also want to check out Version III and  Mk IV – the best yet!). 

Chickpea flour – also known as garbanzo bean flour and besan flour – is high in protein and has lots of vitamins and minerals including calcium – as does Tiger Nut flour, which is naturally sweet and high in dietary fibre.

 We were very pleased with it. You can’t really make traditional large sandwiches – it doesn’t rise a lot – but I had open sandwiches with tahini, lettuce, spring onion and olives and they were very moreish!

image

 We used plain coconut yogurt in place of dairy to make it vegan, and we also reduced the amount of liquid a little.

All measurements are approximate, you may need a couple of attempts to find the right combinations for you.

 Ingredients

25g – 50g (10z – 1 3/4 oz) Organic Golden Linseeds

450 mls (16 fl oz) Warm Water

2 1/2 Tsps Quick-acting Yeast

80 mls (3 fl oz) Plain Coconut Yogurt (or soya yogurt)

11 oz  (312g) Organic Cornflour/ Fine Maize Flour

4 oz (114 g) Organic Chickpea Flour

1 oz (30g) Tiger Nut Flour

1 Tsp Pink Himalayan Salt

1 1/2 Tsps Organic Coconut Palm Sugar

50g (1 3/4oz) Organic Psyllium Husk Powder

50 mls (1 3/4 Fl oz) Organic Raw Virgin Olive Oil

A little extra olive oil and flour

 Method

 Heat the oven to 180C/350F/gas 4

Warm the linseeds on a tray for about 10-12 minutes, until they darken slightly (the toasted seeds will release a sticky gluten-like substance when mixed with the wet ingredients, and they give the loaf a wheatgerm-like flavour).

Switch off the oven.

Mix together the water and yeast, then stir in the yogurt and seeds. Set aside.

Sift and mix together the flour, salt, sugar and psyllium husk powder  in a large bowl.

Pour in the yeast mixture and olive oil and mix well. Don’t worry if it looks like there’s too much liquid. It will turn into a sticky dough within a few minutes as the linseed, flour and psyllium husk powder become gel-like.

Once the mixture is firm enough, knead it for 10 seconds on the worktop to mix everything again, then place the dough back in the bowl, cover and leave in a warm but not hot place for 30 minutes.

Line a tray with non-stick baking paper.

Shape the dough into a ‘bloomer’ shape, ie long and thick, then brush with the extra olive oil, cover and leave it to rise for about 30 minutes.

Heat the oven to 240C/465F/Gas 9 (we have a fan oven and adjusted to 200C).

Make some diagonal cuts across the dough with a sharp knife, sprinkle with a little cornflour and bake for about 40 minutes, or until rich golden-brown in colour.

Cool on a wire rack before slicing.

*

image

Serving suggestions: Peanut butter and banana

image

Sliced avocado sprinkled with lemon juice and black pepper on bread with rocket, watercress and cucumber salad.

http://www.bbc.co.uk/food/recipes/gluten-free_olive_oil_42050

*The Tiger Nut Company

Copyright: Chris McGowan

Easy-Peasy Vegan Cheesy Cashew Sauce or Dip

imageThere are times as an ex-cheese addict when you just have to have something vaguely resembling a cheese sauce or dip, with pasta or crudités or sweet potato chips for instance. Here is a simple basic recipe that you can adapt with your own flavours, making it more spicy if you like eg with chilli flakes, cayenne, garlic and so on. You can make it as thick or as thin as you want, depending whether you prefer a pouring sauce or a thicker dip.

Cashew nuts are an excellent source of magnesium – a mineral in which most people are deficient, see my post Magnesium: Are You Getting Enough? – protein and B vitamins. Nutritional Yeast is a good vegan source of protein with B vitamins and can be used to give a cheesy flavour to sauces, soups, pasta and so on. Some brands have B12 added, it’s a useful vegan source of this important vitamin (see B12: What Is It & Do We Need To Supplement It?). I use Marigold Foods’ Engevita with added B12.

image

All ingredients are organic, measurements approximate.

Ingredients

1 1/2 Cups Cashew Pieces, soaked for a couple of hours more or less, then strained

3 Tbsps Nutritional Yeast

1/4 to 1/2 Cup of Water

A Squeeze of Lemon Juice, more or less according to taste

Slice of Raw Onion, chopped or a couple of Spring Onions, sliced

1/4 Tsp English Mustard

Pink Himalayan Salt and Ground Black Pepper to taste

Paprika or Cayenne Pepper

Method

Blend cashews, nutritional yeast, mustard, water, lemon juice until smooth

Add onion, salt and pepper, blend again either until smooth or with a bit of texture if you prefer

Sprinkle with Paprika, Chilli Powder or Cayenne Pepper

Good with Sweet Potato chips (fries), veggie burger and salad in place of mayo!

image

Copyright: Chris McGowan

Warm Apricot & Ginger Rice Salad with Tamari-Splashed Garlic Mushrooms

image
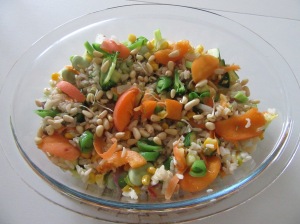
This was born on a very chilly, wet and windy July day a few days after I had finished a 7 day juice challenge. I had been having salads since, and this was my first fully cooked meal. I wanted something light but warming – it didn’t feel at all like summer – but we had a lot of summer vegetables and fruit so we decided to combine a little of both with some filling and nourishing basmati rice and served with large chestnut mushrooms lightly stir-fried with crushed garlic and tamari.

image

Once the rice has been soaked for an hour, the preparation and cooking only takes about half an hour from start to finish.

All ingredients are organic and measurements are as always approximate.

Have a warm dish and a warm plate ready to serve.

Ingredients

1 Cup Basmati Rice, soaked for an hour, rinsed and drained. Cook as normal.

While rice is cooking, prepare:

1-2 or 3 thin slices of Ginger – depending how spicy you want it -chopped finely

1-3 Spring Onions, depending how big or small they are, sliced

5-6 Sugar Snap Peas or Mangetout, sliced

2″ of Courgette/Zucchini, chopped

Floret of Broccoli, thinly sliced

3″ of Carrot, shaved

1/2 Cup Sweetcorn

A few Small Broad Beans

3 Large Chestnut Mushrooms with Stalks separated per person, whole

1 Large Garlic Clove

2 Tsps Coconut Oil

Tamari

Black Pepper

Lightly toasted Pine Nuts

1 Fresh Apricot, sliced

A few Sprouted Mung Beans (optional)

Method

Just before rice is cooked:

Heat 1 Tsp oil each in 2 frying pans

In one, lightly stir-fry all the ingredients on the list up to the mushrooms.

In the other, stir-fry the whole mushrooms and stalks with a crushed clove of garlic and a couple of splashes of Tamari.

Keep everything slightly undercooked with a bite to it.

Place cooked ice in a hot dish and fluff it up with a fork to release the steam. Add some black pepper.

Lightly mix in the stir-fried vegetables, top with, mung bean sprouts, sliced apricot and toasted pine nuts. Place the garlic mushrooms on a hot plate

image

The mushrooms have a salty, meaty texture giving you something satisfying to chew.

Copyright: Chris McGowan