My Top 20 Tips for Juicing – updated to 25!

imagePoor Thalia of Backpacking (and eating) my way around the world was suffering with a nasty flu-like virus and we chatted about juicing to try to clear her sinuses.

(Here’s my daily Morning Glory juice to help prevent and treat colds and hayfever).

One thing that came out of the conversation was that she had got out of the habit of juicing since going on her travels and her juicer was away in a cupboard.

Thalia had broken the number 2 rule for juicing (see below) and so I thought I would revisit my Top Tips for Juicing. There are several posts in the blog Menu with tips for juicing success both as part of Juicing Programmes and for everyday juicing, but I thought I would try to condense it all into one post. So here goes:

  1. Choosing a juicer: if possible, ask a regular juicer what they recommend. Most regular juicers have started with a fairly cheap one to see how they get on with juicing and have progressed through the brands and prices, so will know the difference between a fast, centrifugal juicer and a slower, masticating or cold-pressed juicer. My advice is buy the best you can afford so you won’t be put off juicing from the start by a machine that breaks down/can’t manage celery/leaves or doesn’t extract enough juice. (See Which Juicer? and my review of the Retro Super Juicer for some suggestions).
  2. Always, Always keep your juicer readily accessible! If you have to get it out of a box/cupboard every time you need it and reassemble, it won’t get used. So not only have you wasted your money, you won’t get into the habit of juicing daily or reap the benefits of adding healthy juices to your menu. If you need to create space, get rid of the microwave/toasted sandwich-maker/ice-cream maker/ waffle maker. image
  3. Read a Juicing Book/Watch a Juicing Film to inspire/motivate/help you understand why it is worth doing, how the food and pharmaceutical industries work to manipulate your food and health choices, how juicing works and to explode all the myths put out there by so-called ‘experts’. If your family or friends start questioning or making fun of your attempts to improve your health and fitness, you’ll be better equipped to rebuff their comments! I like Jason Vale’s books/apps and his SuperJuiceMe! documentary (click here to watch for free). He has a light, down-to-earth style, makes you laugh while you learn and has dealt with every question thrown at him by the sceptics by proving time after time that juicing works. (See How I Juiced My Skin Clear and  Juicing: How To Begin to read my own experiences). Joe Cross aka Joe the Juicer also has books, juicing programmes and several inspiring films based on his own experiences of being ‘Fat, Sick and Nearly Dead’.
  4. To avoid any potential side effects like headaches, try not to jump into a full-on juice programme without preparing your body first. Spend a couple of weeks to a month cutting down, then cutting out, processed foods especially those laden with sugar and unhealthy fats – ready meals, takeaways etc. – fizzy drinks (even so-called energy drinks are usually chock full of sugar, chemicals, additives, artificial sweeteners and caffeine), coffee and of course, tobacco and other artificial stimulants. Introduce a juice a day and you’ll feel the benefits in no time at all. (See Do As I Say Not As I Did!)
  5. If possible and affordable, juice organic vegetables. If not, choose local produce where possible. Always wash and scrub well before using. Research the fruits and veg in your country that are the most highly sprayed with chemicals, pesticides, fertilisers, fungicides etc and try at least to buy organic versions of these. Grapes, strawberries and potatoes often fall into this category, for example. Above all, please don’t think juicing is a waste of time if you can’t buy organic. Any fruit and veg are better than no fruit and veg. Just make sure you wash before use.
  6. If organic, you can leave the peel on (except for oranges and grapefruit, and pineapples if you have a juicer that can’t manage the skin).image
  7. If you peel citrus fruit, do it as thinly as possible leaving the pith where the micronutrients are.
  8. Don’t let excuses get in the way. If time is an issue, make your juice/s the night before and put it/them in the fridge for the following day. They are best used fresh but a few hours late is better than not at all.
  9. Keep juices in the fridge, preferably in glass or metal containers to keep them away from the light and from chemical-laden plastic, or in a cool box with ice packs if you need to transport them.  If you’re going to drink them soon after making, glass jars are good to store them and you can drink from them too. We save jam jars for this. image
  10. Keep hydrated. You still need to drink water/herbal/fruit teas in addition to juices. I made this mistake and suffered symptoms of dehydration during my first juice challenge.
  11. Metal Straws are great for drinking juices: no plastic or waxy chemicals, no landfill; they can be used over and over and go in the dishwasher. They come with a tiny brush to clean the inside.  image
  12. Try not to treat juicing as a form of dieting. It is all about adding healthy nutrients to your body in the most accessible and digestible form to optimise health, increase energy levels and improve chronic conditions. Weight loss is a bonus, it comes naturally when you introduce fresh home-made, nutritionally-balanced juices into your daily routine.
  13. All juices are not equal! When I write about juicing, unless I state otherwise, I am referring to freshly-made juices not commercially-produced juices bought in supermarkets. They have generally been pasteurised and stored, often contain added sugars and come in single-use plastic bottles. They don’t have the same nutritional content as home-made juice produced and consumed on the same day and shouldn’t be used as regular meal replacements or for longterm juice challenges.
  14. Beware of adding too much fruit to your juice. This is usual when new to juicing, but as you get used to the flavours and combinations you should gradually reduce the fruit in favour of more vegetable content, especially leafy greens, broccoli etc.
  15. Adding a slice of lemon to a juice helps slow down the oxidation and deterioration of the juice, improves the flavour of green juices and adds its own nutrient content of course.
  16. Rotate the leafy greens so you’re not consuming the same ones every day. This varies the nutrients but also ensures you don’t consume too many oxalates which can lead to kidney stones in those who are susceptible. I alternate kale, spinach etc with romaine and other kinds of lettuce. (Did you know that romaine has good protein content?)
  17. You don’t need to become a juice fanatic to be a juicer. Juice whenever you can. It’s not a competition. There’s no winning and losing, no succeeding or failing. If you miss a couple of days or even a few days, it doesn’t mean you can’t do it. Just don’t put your juicer away. Get right back on the juicing wagon as soon as you can.
  18. This is a contentious one: some say always wash your juicer straightaway (I am one of them), while others say, if you’re in a rush, leave it till you get home. For me, it’s a question of health and safety. If you leave it, the pulp dries and is really hard to remove properly. This can lead to harmful bacteria developing and the last thing you want from a healthy juicing regimen is food poisoning! Also, it can reduce the efficiency of your juicer, even damage it. At the very least, empty it and give it a quick rinse through or leave the parts soaking until you can get to it. For me, there is nothing worse than being faced with dirty pots several hours later.
  19. Try to use the pulp rather than throwing it away. You can use it for burgers, nut roasts and so on, we compost it and our daughter fed it to her chickens! It is full of fibre and still contains some of the original nutrients.
  20. Lead by example. Let your progress do the talking when confronted by naysayers. Don’t let them put you off doing something you find beneficial. I started juicing entirely on my own. It was suggested that it would harm my health, that I was losing too much weight, that neither the juicing nor the weight loss or health improvement were sustainable – that was 3 years ago. Everyone who sees me now compared with 5 years ago remarks on how well I look and how did I do it! Now all the family juice and many friends/acquaintances have bought juicers and not looked back. Here are some of my before and after photos:
  21. If you’re on your own and need some support, advice, inspiration, there are many groups on social media who will be happy to help and you may make some new like-minded friends as I have done.
  22. Jason Vale, Joe Cross, the guys from Food Matters TV and Neil Martin (Natural Juice Junkie) all do regular free juicing reboots/programs/challenges/detoxes if you’d like to join in, get free recipes, apps, coaching etc and share experiences with fellow juicers.
  23. If you want a more substantial juice, blend it with 1/4 avocado. This will add essential fats and make a more satisfying juice, you will feel fuller longer. It is not ‘cheating’, it is providing you with what your body needs and will help prevent random snacking on less healthy foods. Your body needs healthy fats to metabolise certain vitamins, balance hormones and keep your brain functioning healthily.
  24. If ‘super-juicing’ and you have a lot of weight to lose, adding avocado to your juice occasionally can help prevent loose skin.
  25. Finally, REMEMBER NOT ONLY TO USE YOUR JUICER, BUT ENJOY IT TOO. You are not being punished, you are not doing penance. Enjoy getting creative. Enjoy its benefits. You have spent time, energy and money researching your purchase, you made a commitment, it’s not there to decorate your counter or impress your friends and family! You resolved to take control of your diet and health.

Go on…Just do it!

Oh, ps Nutribullets and their ilk are not juicers, they are super-blenders, they do not extract juice.

image

Jason Vale’s website

Reboot With Joe

Food Matters TV

Natural Juice Junkie

Copyright: Chris McGowan

Chewy Chocolate Chip Banana Cookies – Mark 2

Beware! This recipe is in danger of becoming a chain letter!

I saw the original recipe on boingghealth this morning and since I had all the ingredients, even the exact same brands, I knew we had to give them a try.

Besides, he threw down a gauntlet challenging us to come up with new variations on the theme and as everyone who knows the McGowans is aware, a gauntlet is always picked up! Besides, it was fate. Chocolate, banana and peanut butter. Love the combination, how could we not?

Since Kris had already used oats, I swapped for buckwheat flakes (also gluten-free) and bearing in mind his thoughts on not enough peanut butter, I doubled the amount.

Also, he used The Raw Chocolate Company Vanoffe Dark raw chocolate bar, but in the end I decided I couldn’t give mine up so we used their Pitch Dark instead.

So, Kris @boingghealth, I see your Mark – no, it should be Kris – 1 and I give you Mark Chris 2:

Ingredients

(all organic  vegan and gluten-free, you could swap the peanuts and peanut butter for almonds/almond butter and use whichever flavour of chocolate you prefer)

2 Medium Very Ripe Bananas (spotted skins)

1 Cup Buckwheat Flakes

3/4 Cup Ground Red Peanuts

2 Tbsps Palm Oil-free Peanut Butter (we use Meridian)

1/2 Tsp Vanilla Extract

Pinch of Pink Himalayan Salt

1 Mini Bar The Raw Chocolate Company Pitch Dark Chocolate, broken up, either reserve some for drizzling or open another bar and who’s to notice if half gets diverted to your mouth?

 3 Pulsin’ Kitchen Cacao Butter Buttons (easier to use than a solid block)

Method

Oven 170C as we have a fan oven, Kris recommends 180C for normal oven.

Mash the bananas really well with a fork

Mix in all other ingredients except 4 squares (approx.) of chocolate and cacao butter dops – they are for melting and drizzling later.

Spoon onto baking tray covered in baking parchment, shape into cookies

Cook about 12 minutes until golden

Cool on a rack

 Melt chocolate and cacao butter buttons

Drizzle on cookies when cool.

Ours made 12.

This slideshow requires JavaScript.

I reckon you could add dried fruit – raisins or chopped dried apricots – even coconut for other versions, but I’m going for beetroot next time, what do you think?

Pass it on, refer to the other versions and let’s see what you all come up with! 

Update: Just made some more of these and added 1/4  Cup Raisins & a sprinkling of cinnamon plus we used Vanoffe Dark this time. (It was a sacrifice,  but someone’s got to do it ;-))

img_2744

http://www.therawchocolatecompany.com/

http://www.meridianfoods.co.uk/

http://www.pulsin.co.uk

Copyright: Chris McGowan

Food Matters’ ‘One Minute Slice’ Raw Chocolate Protein Bars

So excited about this recipe! I stumbled on it when looking at Organic Guinea Pig’s Facebook page* where he posted photos of himself trying out this Food Matters* recipe and it looked so good I had to try it.

These bars are full of energy and are such a healthy chocolatey treat that you can literally make in a minute. You just mix everything up in a bowl, spread it out in a baking tray and freeze. Done!

You can have them smooth or crunchy like these, depending on how fine or chunky you grind the cashews. Everyone who tried it loved it: kids, tweens, teens and oldies alike.

All ingredients are organic except the maple syrup which we substituted for the honey to make them vegan. The original recipe has Sultanas but we didn’t have any so used Raisins instead. A second batch had chopped almonds and goji berries in.

Vegan and gluten-free. All measurements are approximate.

Ingredients

 7 Tbsps Peanut Butter (but you could use any nut or seed butter, we used Meridian Organic & Palm Oil-free)
3 Tbsps Melted Coconut Oil
1-2 Tbsps Maple Syrup, depending how sweet you want it, 1 is enough for me
2 Tbsps The Raw Chocolate Company Cacao Powder *
Half Tsp Vanilla Extract

Combine all these in a bowl

then add

Half a Cup of Cashew Pieces (125g), chopped (or seeds)
Half a Cup of Sultanas or Raisins (125g) (Chopped Medjool Dates would probably work too).

Mix it all together well, you only need to give it a good stir, no need to get the mixer out.

Spread in a square baking tin and freeze for at least a couple of hours.

image

Slice and eat.

(They melt really quickly, especially in summer weather, so don’t get them out of the freezer until you actually need them).

*https://www.facebook.com/OrganicGuineaPig/

*Food Matters Website – lots of healthy recipes

*http://www.therawchocolatecompany.com/

Copyright: Chris McGowan

Light & Summery Strawberry & Banana Smoothie

Finally, Summer has arrived up North and this is a lovely light summery smoothie, with healthy fats and protein, prebiotics and probiotics for a healthy gut and digestive system, dietary fibre, and lots of vitamins and minerals.

Do you know strawberries are not really fruit as their seeds are on the outside? They are bursting with nutrients, including Vitamin C, folate, B Vitamins, Vitamin K (needed for bone health), they are rich in powerful antioxidants and are thought to help prevent heart disease, cancer and inflammation. The leaves can also be eaten or made into tea.

Try to buy organic strawberries as this fruit is considered one of the ‘dirty dozen’, being one of the most sprayed fruits and retaining chemical residue.

image

(Apologies for the smoothie photo, no natural light at all when I took it, the smoothie actually looked much lighter and slightly pink).

Ingredients

1 Small Banana

10 Strawberries, washed and hulled

Handful of Pumpkin Seeds

1 Heaped Tbsp Chufa de Valencia Tiger Nut Flour

1 Heaped Tbsp Golden Linseeds, partially ground

1 Medium Glass Rebel Kitchen Organic Raw Coconut Water

1 Heaped Tbsp CoYo Plain Coconut Yogurt

1 Tsp Juicemaster Wheatgrass Powder

Blend and add ice.

http://coyo.com/enuk/

Juice Master

Home-2016

Home

Here’s a short but energetic video by The Undertones – watch the keyboard ‘player!’

Copyright: Chris McGowan

Golden Linseeds (aka Flax Seeds): The Original Superfood?

The latest post in my mini-series Essential Vitamins and Minerals (see Menu).

imageI was asked if I would write a post about Golden Linseeds as I often use them in my recipes. They are the lighter coloured of the 3 versions of flax seeds – being a golden colour they are commonly known by that term.

They are one of my favourite things to add to smoothies, protein bars and energy balls, fruit and yogurt, muesli, gluten-free bread and so on. I’ll provide some recipe links later on.

A few facts first:

The flax plant grows easily, producing small pale blue flowers, and produces pods of seeds that have been consumed by humans for over 6000 years.

Organic are best, to avoid any potential toxicity, buy them whole rather than in powder form and grind them a little in a coffee grinder or nut and seed grinder, a jarful at a time, and keep it in the fridge. Don’t over do it or the heat will damage them and turn them rancid. Grinding releases the oils and makes the nutrients more accessible. (The most effective way to have them is soaked and sprouted, this removes phytic acid – present in nuts and seeds – which can bind to minerals in the body, and releases even more nutrients, but I haven’t tried this yet).

They have a pleasantly mild, slightly nutty, malty taste. I love them!

(To view the slideshow, click onto the blog).

This slideshow requires JavaScript.

Linseeds are one of the most nutritious foods available, being rich in Protein (3 Tbsps = 6g), Fibre, B1, Manganese, Selenium, Vitamin E and especially the Omega-3 Fatty Acid Alpha-Linolenic Acid (ALA). They are the richest plant-based source of this essential fatty acid, so good for vegans and vegetarians.

In particular, they are one of the best sources of Magnesium, necessary for preventing muscle cramps, for lifting mood, restful sleep, and a healthy gut – see my post Magnesium: Are You Getting Enough? for further information about this essential mineral that many people are defficient in.

Linseeds are also a good source of B6, Iron, Potassium, Copper and Zinc as well as Folates, which help prevent neural tube defects in the foetus if consumed prior to conception and in early pregnancy.

The healthy oils in linseeds are beneficial for healthy skin, hair and nails – try adding 2 Tbsps of seeds or 1 Tbsp of flaxseed oil daily to smoothies to benefit.

1-2 Tbsps of flaxseed oil can help improve acne, eczema and roseacea as well as help reduce symptoms of dry eye syndrome.

 People with Crohn’s or other digestive problems often find some relief when consuming linseeds as they are anti-inflammatory and can reduce gut inflammation. They are also gluten-free.

The anti-inflammatory nature of linseeds is also thought to aid in weight loss. Try adding 2 Tbsp of ground linseeds daily to your diet. They help you feel full for longer and aid the elimination of waste, which otherwise is held onto by the body and causes inflammation.

Finally, linseeds are packed with anti-oxidants called lignans. They are anti-aging and hormone-balancing, can help reduce menopausal symptoms and reduce the risk of osteoporosis as well as help regulate menstruation. 1-2 Tbsps of seeds plus 1 Tbsp of oil daily are recommended. These anti-oxidants are also antiviral and antibacterial and can help reduce the number and severity of colds.

Oh, and Dr Axe* recommends 1-3 Tbsps of flax oil and 8oz of carrot juice for the relief of constipation!

I think that just about covers everything.

(Linseeds like chia seeds can be used as egg replacement in vegan cooking when mixed with water).

As with all similar high fibre foods (chia seeds, for example), be sure to drink plenty of water and other liquids.

We buy our golden linseeds from Buy Wholefoods Online and Suma Wholefoods

As promised here are some links for recipes containing these little specs of nutritional gold:

Omega-Rich Plum & Blueberry Smoothie

Camilla’s Homemade Crispbread

Dipped Naked Tiger Nut, Mango & Orange Treats

 *https://draxe.com/10-flax-seed-benefits-nutrition-facts/

http://www.nutrition-and-you.com/flax-seed.html

Copyright: Chris McGowan

Omega-Rich Plum & Blueberry Smoothie

imageI devised this when I was writing a post on Golden Linseeds (see here) and I wanted a recipe to accompany it. Smoothies are a great way to ensure you get the essential fats contained in golden linseeds, along with all the other vitamins and minerals they provide.

Omega fatty acids are essential for brain and nerve health, but our bodies can’t produce Omega 3 or Omega 6, and a couple of tablespoons of linseeds in a smoothie will go a long way to fulfilling your body’s requirement.

Pumpkin seeds also provide Omega 3 and Omega 6 fatty acids while cashews provide a trace amount.

Along with oats, cashews are a good source of magnesium, a mineral we all need but rarely get enough of.

Wheatgrass contains all the minerals known to man as well as protein, fibre, B Vitamins, Viamins A, C, E and K.

The seeds and nuts also add to the overall protein content of the smoothies. 

Plums are a good source of potassium and iron, while blueberries are another item on the list of so-called superfoods, which are anti-ageing, are believed to help prevent and improve age-related mental impairment, and are a source of Vitamin K which is necessary for bone health.

Vegan and Gluten-free, Organic except the maple syrup.

Ingredients

1 Tbsp Gluten-free Oats

1 Medium Glass Rebel Kitchen Raw Organic Coconut Water

2 Tbsps Golden Linseeds, partially ground to make the nutrients more accessible

1 Tbsp Pumpkin Seeds

Small Handful of Cashew pieces

1 Tsp Wheatgrass Powder

A Handful of Blueberries

2 Ripe Plums, stoned and chopped

1 Medjool Date, pitted

1 Tsp Maple Syrup (optional)

 Blend and serve with ice or use chilled coconut water and frozenblueberries.

(If reading this via email, click onto the blog to see the video).

Copyright: Chris McGowan

Quick, Plain & Simple, Savoury Vegan Snacks (Gluten-Free Too!)

When someone discovers I’m vegan, I can see their brain working overtime with all those questions people feel obliged to seek answers to when faced with this anomaly. Along with ‘Where Do You Get Your Protein?’ ‘Where Do You Get Your Calcium?’ best of all, ‘You Mean You Just Eat Fish??!’ and more recently What Do You Eat If You Can’t Have Anything Naughty? (includes links for dessert recipes), the next question is often plain, simple and to the point: ‘So What Do You Eat?’

It’s really not that complicated. I’ve posted several vegan dinner recipes in the Menu: curries, soups, salads, stir-fries, rice and quinoa salads for example. But I snack like everyone else, I just don’t eat cheese, or bacon sarnies, or anything processed to within an inch of its life!

For anyone wondering how aliens – I mean vegans! – keep going, I thought I would put together a post with a few of my favourite savoury, vegan and gluten-free snacks or light lunches: nothing too ‘weird’ like kale chips, or fancy or time-consuming if you already have the ingredients in the cupboard or fridge.

These are foods I often have for a late afternoon snack when I generally feel that energy dip and dinner is too far away to wait. Sometimes all I need is a juice, others I feel the need for something more solid. There are lots of recipes for healthy raw sweet treats in the Menu too, but the following suggestions are for when you want something savoury and quick and perhaps a little more substantial.

They all have protein and healthy fats to fill you up and provide energy.

imageFirst up is my favourite: Celery and Apple with peanut butter and a couple of Nairns gluten-free oatcakes, either plain or herb and seed, or with my version of Camilla’s Homemade CrispbreadI love the fruity savoury contrast of the flavours as well as the crisp crunchy texture. It satisfies on all levels. Any nut butter works, of course, and corn cakes or rice cakes are another option. Also, homemade gluten-free bread (click the link for my recipe, which includes two earlier versions as well). Apple and peanut butter or celery boats with nut butter are great snacks for children too, especially when they come home from school tired and hungry, providing more slow-releasing energy than a packet of crisps or sweets.

(There’s a recipe for Sweet Apricot Kernel Butter here).

image

Next is another frequent flyer in our household, lightly toasted imageseeds with Tamari. This is usually a combination of pumpkin, sunflower and sesame seeds, amd perhaps some buckwheat, which are lightly toasted under the grill – you have to keep your eye on them and keep stirring them about, nothing happens for quite a while but if you go away to do something else they will be black when you return! Don’t overbrown them, it damages the oils, keep them light. Then remove from the grill and splash Tamari over them. It will sizzle and you need to mix up the seeds quickly to coat them all before it dries up. Love the salty crunch! You can eat them on their own for a protein pick-me-up or sprinkle on stir-fries and salads.

imageHumous is an old standby and there is always some in our fridge. The whole family loves it, even the babies and teenagers! I love it with crudités and oatcakes. Or with a salad. Plain and simple.

There are so many recipes out there to make your own, it’s so easy and you can vary the flavours and textures by adding chilli, paprika or cayenne, lemon juice or lime. Most of the time though, I confess we have ready-made (always organic) because inevitably I get the urge too late and need something right here, right now! We don’t always have time or the forethought to prepare ahead of time, and to be honest I am one of those people who never knows what they’re going to want to eat several hours in advance. It drives my husband crazy as he is the opposite and likes to have a week’s menu set up, but I can’t do it. That’s why we favour simple, quick, thrown-together meals.

imageOpen sandwiches are always good for a more substantial snack or light lunch. These are made in my case with home-made gluten-free bread, topped with avocado and green salad, or peanut butter and banana, or even made with sliced and toasted sweet potato!

(Yes, you read that right, Sweet Potato Toast. But more on that in a minute).

image

My grandchildren would have added strawberry jam to this combination, but I’m not a fan of PB&J.

We recently made a loaf with organic cornflour, tiger nut flour* and imagechickpea flour (recipe here). We sliced it up and put some in the freezer for afternon snacks or light lunch for me, when it is lightly toasted and, in this photo, spread with tahini and topped with romaine, ridge cucumber, spring onions, green olives and black pepper. Very satisfying.

image

But my pièce de résistance is Sweet Potato Toast!

A young woman had a hankering for avocado on toast but discovered she had no bread. Not to be done out of having her beloved avocado, she sliced up a sweet potato and put them in the toaster! Ta-da! A new snack was born.

We experimented one weekend and discovered they need to be thinly sliced and need two full goes in a basic toaster, about 10 minutes or so, depending on the thickness of the slices and whether you want them soft or with a little bite.

imageIn this photo, we have banana and peanut butter, tahini topped with lightly toasted sesame seeds sprinkled with Tamari, Natex low salt yeast extract – which didn’t work too well, the flavour was fine but it melted and ran off the sweet potato when it was picked up to eat – and most ingenious of all: whole-fruit, sugar-free strawberry jam! And it was so filling, I could only eat two of them. I saved the others for later, they were fine cold as well.

Speaking of sweet potatoes: There is no better comfort food than Sweet Potato Oven Chips! We scrub the sweet potatoes (organic), leave the skin on and slice very thinly. Melt some coconut oil, add any seasoning you like – salt, chilli powder, black pepper, cumin seeds etc – and toss the chips in it. Spread them on a tray and cook for about 20 minutes at about 180C in a fan oven. Turn them over occasionally. Good on their own, with humous or any other dip. This one is Cheesy Cashew Dip with Paprika and Onion (recipe here).

Of course, for convenience, nutrition and portability, you can’t really beat plain cashews, almonds and walnuts with raisins, dried apricots, some shredded coconut and mixed seeds to create your own trail mix.

Hope that’s enough to keep you going! You see, I’m really not just sitting here nibbling on a lettuce leaf with a carrot on the side 😉

*http://www.thetigernutcompany.co.uk/

Copyright: Chris McGowan

Crunchy & Spicy Roasted Chickpea Nibbles

image
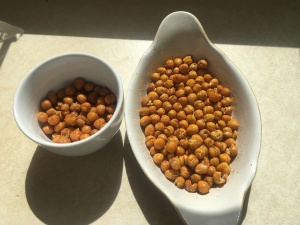
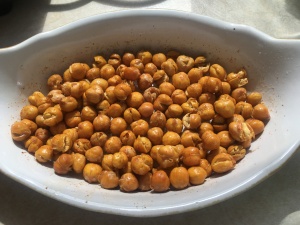
Chickpeas are so good for you on so many levels: protein, calcium, iron, fibre, so many vitamins and minerals. We are used to putting them in casseroles or stews or making hummus with them, either as they are or sprouted.

But have you ever had them roasted? They make a great savoury or sweet snack that is healthy and satisfying.

We tried both oil-roasted and dry-roasted. We also tried seasoning before cooking and after.

Here’s the result.

Method

Set Fan Oven at 200C.

Take a can of chickpeas, strain and rinse well.

Dry between 2 clean tea towels, discard any skins that come off, don’t bother about the others.

Divide them between 2 baking tins or trays.

For the oil-roasted, melt a tablespoon of coconut oil and pour over half the chickpeas, which have been sprinkled with Pink Himalayan Salt. Turn them so they are all covered in oil.

For the dry-roasted (right), place them in a baking tin as they are.

Place trays in oven.

Now the timing is a bit weird.

All the recipes I looked at suggested 40-45 minutes.

The oiled ones were crisp and cooked in 20 minutes (turned halfway through) and about to get burned.

The dry-roasted ones were ready 5 minutes later!

My best advice is don’t go away and leave them. Turn or shake a couple of times and they’re ready when deep golden and crispy. Some people like them crisp on the outside with a little bite to the centre, others like them crunchy all the way through.

The oiled ones were left as they were, no extra seasoning.

 The dry-roasted ones were tipped into the dish I had melted the coconut oil in which was empty but still had a little smear on the surface. Salt and paprika were sprinkled into the dish and the dry-roasted chickpeas tipped in and mixed around.

Which did we prefer?

Both!

My husband couldn’t tell the difference and I thought the oil-cooked ones were a little oily but I liked the crunchiness.

Here they are side by side for comparison: can you tell which is which?

image

The ones on the left are oil-roasted.

They are really filling, I couldn’t eat even a quarter of them, and make a great afternoon snack or sprinkles for salads or stir-fries. You can add chilli powder if you want them a little more spicy.

Some people like them sweet, tossed in maple syrup and cinnamon for instance.  I prefer savoury.

Hopefully, they’ll give you enough energy to take to those ‘Wide Open Spaces’. (If reading this via email, click onto the blog to see the Dixie Chicks video and be inspired!)

Copyright: Chris McGowan

Vegan, Gluten-Free Plum Crumble – Nice, But Not Too Naughty!

You may remember in my previous post I was asked what I ate if I couldn’t have anything ‘naughty’ (see here). Well, that day, our neighbour gave us some plums from his garden and as our teenage friend was coming to visit again the next day – this time with his dad and dad’s partner – we decided to make a huge plum crumble. If you read the earlier post, you’ll understand why it had to be huge: teenage boy/growing/neverstopseating!

Here’s the recipe: no refined sugar, just a little maple syrup and a lot of natural flavour! Unfortunately, we didn’t weigh the plums, there were enough to fill a supermarket ice-cream box.

The topping can also be used for an apple or any other fruit crumble.

Ingredients

(Organic where possible, all quantities are approximate)

Plums, washed, stoned and cut in half

Cinnamon to taste

1 Tbsp Maple Syrup

A Few Tbsps of Apple Juice, but don’t drown them

image

Topping

4 oz Gluten-Free Oats – if you prefer a finer texture, grind the oats and buckwheat flakes into flour

2 oz Buckwheat Flakes

2 oz Almonds, finely ground

(You could replace the almonds with desiccated coconut for an alternative flavour)

Approx. 2 oz Raw Virgin Coconut Oil, gently melted over warm water

1-2 Tbsps Maple Syrup

If you want a little more sweetness, you could add a small handful of raisins, either to the plum base or to the crumble topping.

Method

Place the plums cut side up in an ovenproof dish

Add Apple Juice

Sprinkle with Cinnamon

Add Maple Syrup

To make the topping:

Place all the dry ingredients in a large bowl and mix together

Stir in the coconut oil and maple syrup (and raisins if using)

Mix together well with a round-bladed knife and then through your fingers to create the crumble effect

Cover the plums

image

Place dish in oven at 170C for a Fan oven for about 40-45 minutes. Keep your eye on it, it needs to be golden, not dark brown!

Serve hot or cold with custard or plain yogurt, or Nana Rhys Cream with Mango, Cacao & Peanut Butter – the men had custard, I had CoYo plain coconut yogurt. I think it’s even better the next day when the crumble has soaked up some of plum juice.

image.jpeg

Makes enough for about 6 or 7 servings.

Our teenage friend gave it the thumbs up and had his two servings as per normal!

Copyright: Chris McGowan

Nana Rhys Cream with Mango, Cacao & Peanut Butter

imageThis dessert is named after our 13 year old friend, Rhys, who has been visiting while his military dad is away ‘on manouevres’ (we all think he’s having a whale of a time in the sun, really).

Rhys is at that age when boys just sprout every other day and every time you look in the fridge, the contents have not-so-mysteriously evaporated!

So having restocked since he was here the other day, we decided on chilli, rice and salad for dinner, making extra of course (sorry, didn’t think to take a photo before it was hoovered up!) Rhys had too big platefuls, reneging on a third because I had promised home-made dairy-free nice-cream if he still had room. Foolishly, I was convinced this time we would fill him up! He looked up from his empty plate, smiling with the face of a choir boy and asked if he could still have dessert.

We played it by ear as always, guessing as to quantities amd allowing Rhys to ok the ingredients. At first, it came out a bit like a smoothie, then we added frozen mango, whizzed it up again and put it in the freezer for an hour, which thickened it up but didn’t freeze it solid. It was perfect.

Ingredients

(All organic except for the maple syrup)

3-4 Frozen Ripe Bananas, sliced, depending on size

1 1/2 Cups Frozen Mango Pieces

2 Cups Coconut Milk

3 Tbsps Raw Chocolate Company Cacao Powder

1 Tbsp Maple Syrup

1 Dsp Meridian Palm Oil-free, sugar-free Peanut Butter

Pinch of Pink Himalayan Salt

 Blend on high until smooth, but don’t overdo it. Pour into a freezer-proof box and freeze about an hour. If it’s half and half after that time, pour into a bowl and stir a couple of times.

Serve with toppings of your choice.

We used:

Coarsely chopped Almonds, Grated Raw Chocolate Company Mint Chocolate bar, Organic Desiccated Coconut

There was too much to all fit in the freezer box, so each of the three of us had a small glass dish of the smoothie left over in the blender as a taster while we waited for the real McCoy! Rhys had 3 servings altogether.

I think it passed muster.

(Ps There are more Raw Chocolate Recipes here).

http://www.therawchocolatecompany.com/

Copyright: Chris McGowan